Have you ever wondered how some photographers produce those shots of clouds that look amazing and water that looks like silk running over rocks? Or perhaps those wonderful hazy looking images, where the movement is really blurred even though the scene was photographed in broad daylight?
Well the answer is........they used Neutral Density filters.
As landscape photographers we normally strive for the perfect sharp image and accomplish this by selecting a small aperture, which in turn results in fairly long exposure times. The problem we often encounter however is our exposures are almost never long enough to blur clouds or water movement, especially during broad daylight.
What are Neutral Density filters?
In order to achieve exposure times ranging from several seconds to minutes, we need to reduce the amount of light, and this is essentially what a Neutral Density (ND) filter does. An ND filter is simply a special semi-transparent piece of glass, resin or polyester (plastic) that effectively blocks out light from reaching the digital sensor. As a result our exposure times are extended by seconds or minutes depending on the strength of the filter.
How to Use ND filters
The good news is ND filters don’t radically affect the image that our cameras capture, but merely slow down the amount of time it takes for the sensor to actually record the image. However if used when elements of our scene are moving (e.g. water, clouds or even people) they open up a world of creative possibilities.
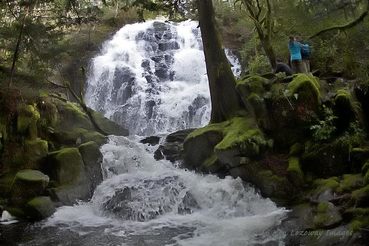
For example the image below was created using a regular shutter speed, and the effect was to freeze the waterfall; as a result it looks static and rather dull.
Well the answer is........they used Neutral Density filters.
As landscape photographers we normally strive for the perfect sharp image and accomplish this by selecting a small aperture, which in turn results in fairly long exposure times. The problem we often encounter however is our exposures are almost never long enough to blur clouds or water movement, especially during broad daylight.
What are Neutral Density filters?
In order to achieve exposure times ranging from several seconds to minutes, we need to reduce the amount of light, and this is essentially what a Neutral Density (ND) filter does. An ND filter is simply a special semi-transparent piece of glass, resin or polyester (plastic) that effectively blocks out light from reaching the digital sensor. As a result our exposure times are extended by seconds or minutes depending on the strength of the filter.
How to Use ND filters
The good news is ND filters don’t radically affect the image that our cameras capture, but merely slow down the amount of time it takes for the sensor to actually record the image. However if used when elements of our scene are moving (e.g. water, clouds or even people) they open up a world of creative possibilities.
For example the image below was created using a regular shutter speed, and the effect was to freeze the waterfall; as a result it looks static and rather dull.
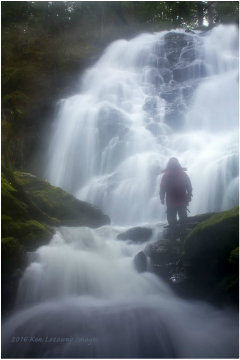
Use a ND filter to capture the water as a blur and it conveys a sense of movement. Place an individual in the foreground ....... and MAGIC!!
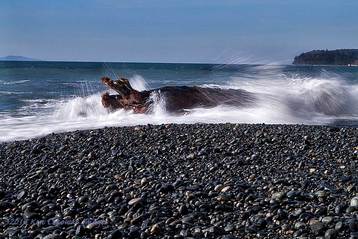
As you can see ND filters give you the flexibility to set the aperture and shutter speed you want, rather than what the conditions dictate. I have also use ND filters on a sunny day to slow things enough to create a sense of movement, but they’re even more effective around dawn or dusk, when they can turn an already-slow exposure into one several seconds long. This technique was used below to turn a surging tide into a gentle mist.
When to Use ND Filters
I have found that for waterfalls you don’t necessarily need a very long exposure to capture motion blur. The water is moving so rapidly, so a three-stop ND filter will work fine in the middle of the day.
However, if you want to achieve a similar effect with a seascape you’re looking at an exposure that lasts 30 seconds or more, as the sea and clouds aren’t moving as quickly.
Shooting during the ‘golden hours’ at dawn or dusk will help, as the lower light levels will facilitate longer exposures – and of course the quality of the light will help to produce great images!
ND filters aren’t just for blurring the elements – you can use them to make moving people disappear! You’ll need a really long exposure of several minutes, but people walking through a scene will simply vanish. This technique is often employed by architecture photographers when shooting crowded tourist hot-spots.
Furthermore it’s not just slower shutter speeds that can be obtained by using ND filters. If you’re shooting portraits on a bright, sunny day, for example, you may find you can’t shoot at wide apertures to obtain a shallow depth of field because it requires a shutter speed that exceeds the fastest available. Adding an ND filter will enable you to select a wider aperture.
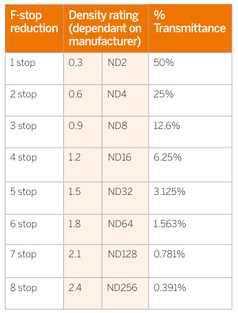
Making sense of the numbers on ND filters
Confusingly, different ND filter manufacturers use different scales to denote optical density. You can use the table below, (created by Digital Camera World) to ensure you get the right filter for your needs.
I have found that for waterfalls you don’t necessarily need a very long exposure to capture motion blur. The water is moving so rapidly, so a three-stop ND filter will work fine in the middle of the day.
However, if you want to achieve a similar effect with a seascape you’re looking at an exposure that lasts 30 seconds or more, as the sea and clouds aren’t moving as quickly.
Shooting during the ‘golden hours’ at dawn or dusk will help, as the lower light levels will facilitate longer exposures – and of course the quality of the light will help to produce great images!
ND filters aren’t just for blurring the elements – you can use them to make moving people disappear! You’ll need a really long exposure of several minutes, but people walking through a scene will simply vanish. This technique is often employed by architecture photographers when shooting crowded tourist hot-spots.
Furthermore it’s not just slower shutter speeds that can be obtained by using ND filters. If you’re shooting portraits on a bright, sunny day, for example, you may find you can’t shoot at wide apertures to obtain a shallow depth of field because it requires a shutter speed that exceeds the fastest available. Adding an ND filter will enable you to select a wider aperture.
Making sense of the numbers on ND filters
Confusingly, different ND filter manufacturers use different scales to denote optical density. You can use the table below, (created by Digital Camera World) to ensure you get the right filter for your needs.
Well that's about it for this week. Please don't hesitate to contact me if you have any additional questions with respect to selecting and using ND filters.
In my post next week I will discuss how and when to use Graduated ND filters. Thanks for visiting and lets get out there and capture some great images. Till next time "Keep your eyes open and your lenses dry. Good Shooting Everybody".
In my post next week I will discuss how and when to use Graduated ND filters. Thanks for visiting and lets get out there and capture some great images. Till next time "Keep your eyes open and your lenses dry. Good Shooting Everybody".